active art, Life

Building a Rock Climbing Wall on Maui

When I moved to Maui three years ago I didn’t think there was any rock climbing on the island. The volcanic rock I encountered was either black, sharp and brittle, or red, crumbly and sandy. And there were definitely no climbing gyms to be found.

Of course, as someone who grew up in the midwest, what the hell did I know about rock formations? It turns out there is at least one crag with some pretty good routes, more to be developed, and some decent bouldering as well. But before I would find those, I came across a makeshift bouldering gym in a warehouse, built and frequented by a diverse group of fun, welcoming, generous people.

maui's only climbing gym (RIP)

Maui’s bouldering gym. Which is sadly, no longer standing.

I was beyond excited to find this spot. I had tried bouldering a few times in Chicago, but had to stop when moving to Maui. So as soon as I started again I was all in. Instantly I was like a kid again, climbing trees, grabbing holds, shifting my balance and body in weird ways, jumping, falling, rolling.

I love the physical dexterity, visual-spatial reasoning, the creativity involved in the sport. And the collaborative atmosphere is great. No matter your fitness or skill level, everyone at the “gym” gets excited for you when you finally finished a route you’ve been working on. It reminds me a lot of skateboarding. You’re working on a problem (or trick) as an individual, wrestling with the strategy and execution on your own, failing repeatedly until finally you make it. It’s immensely satisfying. And everyone knows that feeling of finally sending a route, so when you finally make it they’re as excited as you are. And when you see someone finally finish a project they’re working on you feel it too.

One of the first things that struck me when beginning to climb was just how weak my grip strength was. For most of us, long before any other part of you is tired, your fingers and hands give out. You simply can’t squeeze and grab on to the holds you need to finish a route.

I immediately wanted to train my grip strength, partially so I can climb harder routes, but mainly, just so I can climb longer. Frankly, I want to climb every day, and do it for as long as possible. So in service of that goal, I decided to build an adjustable bouldering wall in our carport.

I decided to use two sheets of plywood, set vertically against the wall, with about a 12 inch gap between them. Most of the time they stand up flat against the wall, secured to some eye rings. Then to make it a little harder, they can be unscrewed and then lay against a cross-beam, creating about a 20 degree overhang.

climbing holds, rough plans and the two panels against the wall

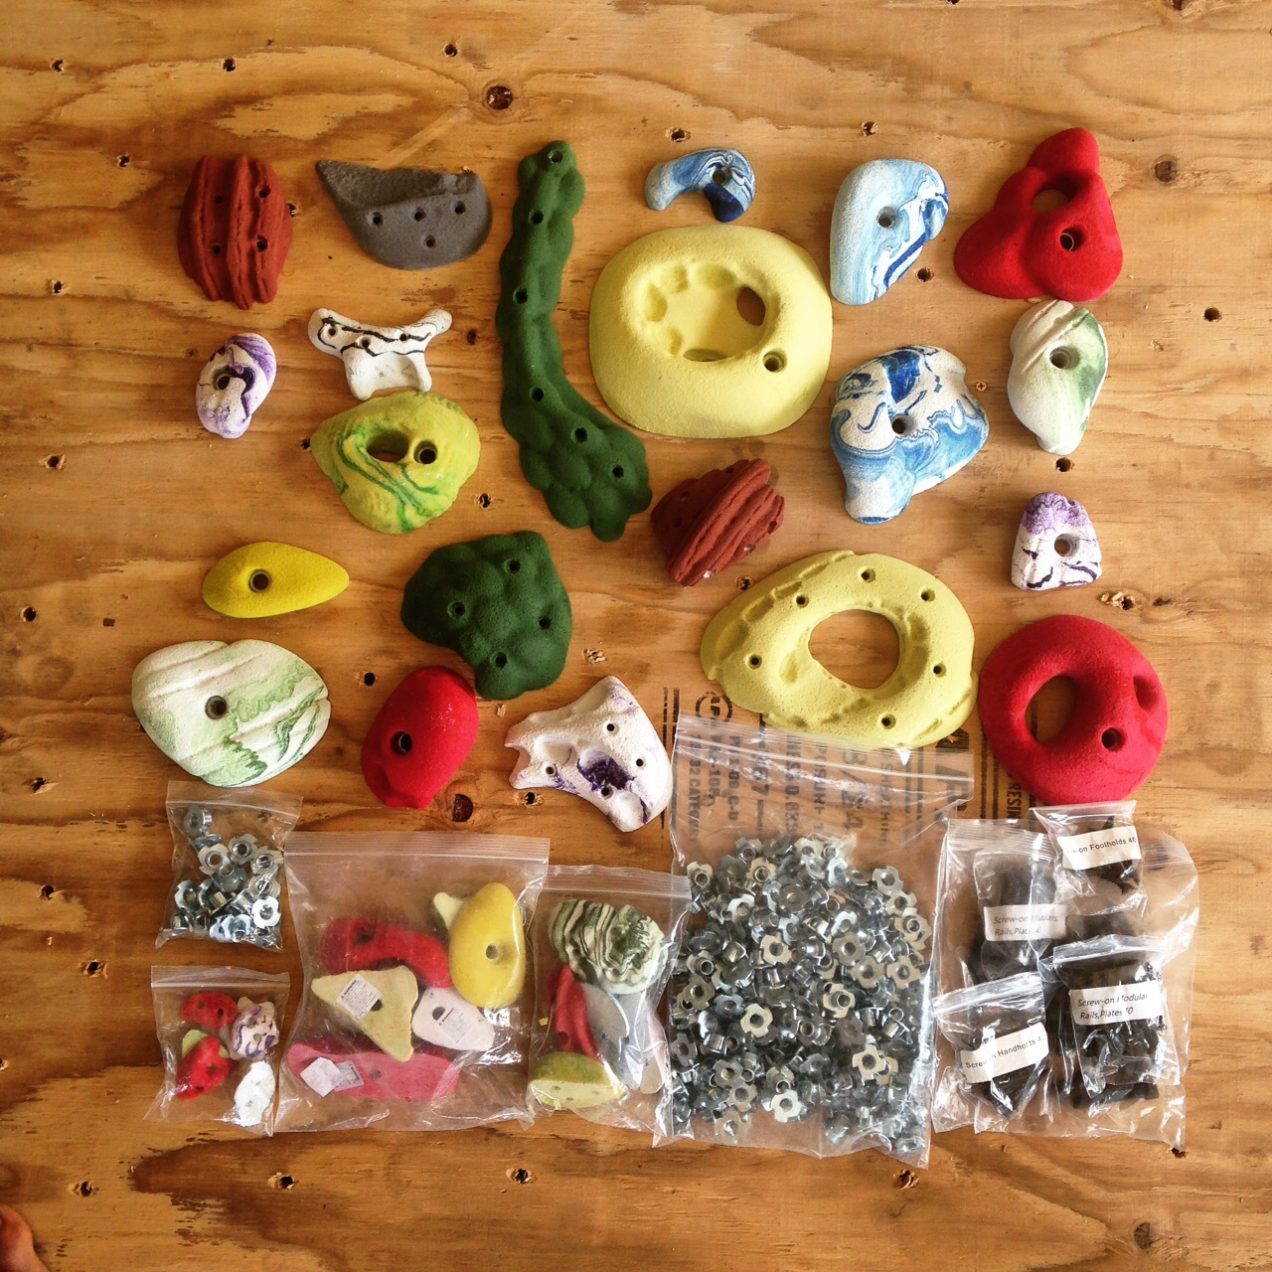
The first set of climbing holds (Metolious), Rough dimensions for the structure, and the two panels in place against the wall.


IMG_1301-edit

One Panel lowered, with crash pads

IMG_1295

Both bouldering panels lowered to 20 degrees

I can lower one or both of the panels if I like, and there are some holds screwed into the cross-beam that they rest on, so there are plenty of little routes I can do. None are too long, but it’s great for keeping the hands active between climbing sessions at the gym or outside. And when the panels are flat against the wall it takes up almost no room.

The whole project cost about $300. About $150 for lumber and some fasteners (Maui prices…), and another $150 for two sets of holds and T-nuts. Which is a little pricy, but not too bad when you compare it to what you’d pay for a couple months of a gym membership or yoga classes or a single surfboard.

One of the great thing about bouldering is that once you have something to climb you don’t need much equipment. I got some crash pads, but you could easily use an old mattress for padding. And you don’t need ropes or a harness. As some people on Maui have taught me, you don’t even need shoes, though most people prefer them. For someone who sweats as much as I do, chalk is a must, though.


Standard
active art, arduino, art, human computer interaction, programming, Throw, web development

Active Art Project, “Throw”

I’ve recently started on an art project that’s going to combine 4 of my absolute favorite activities, creating digital art, web-development, construction, and throwing balls at things. I’m so excited about this idea!

This project has been in the planning/research stages for a while, but I’m still very early on, and I want to write about the project and the process as it progresses here.

What is it?

There are several ways I could answer that, let me start with how one will use it.

You’ll start off holding a tennis ball, standing 10 – 60 feet away from a plywood board with a frame around it. On this board, you’ll notice an 8×8 grid of 4″ squares painted on it. An LED light will shine from one of these squares, and you’ll be instructed to hit that square with the tennis ball.

You’ll throw the ball, and a monitor, or nearby tablet will blink and give you a score, showing you where you were supposed to hit and where you hit. There will be two grids on this screen, grid one will show a color plotted on the square you were supposed to hit, and grid two will show the same color plotted wherever you actually hit.

After repeating this process 63 times. You’ll end up with a final accuracy score and two grids, one will be the source image you were (unknowingly) attempting to recreate, and the second will be your recreation. Theoretically, if one had perfect aim, the two would be exactly the same.

These two images will be automatically uploaded to a web-app where they will be added to two larger images. Image 1 gets placed, like a puzzle piece among other source images, to ultimately create the larger original source image from which it came. Image 2 (the recreation attempt) gets placed, similarly among the other recreation attempts created by the throwers before you, to ultimately create a collective recreation attempt of the larger original image.

How does it work?

Well, that’s where it gets interesting.

Basically, how the board will work, is that a couple inches off the board’s surface, built into the surrounding frame, there will be 2 arrays of 36 light sources (laser diodes (or LEDs), arranged along the X and Y axes of the board (72 total). Directly across the board from each of these, will be a corresponding light sensors (phototransistors or photoresistors). This will create a grid of beams, all connected to an Arduino Uno microcontroller.

When an object passes through this beam grid, it will temporarily block some of the beams. By monitoring which beams are blocked on both the x and y axes, the Arduino & computer it’s connected to, will determine (approximately) where the ball hit the board, and feed this information into the web-app. Voila!

So I know how to build the web-app, how to build the wooden frame, and definitely how to throw tennis balls at things, but electronic hardware, well, that’s not my strong suit. Hence, me joining Maui Makers and learning about Arduinos. People on the Arduino forums have also been very helpful, if you’re interested, check out the Arduino forum thread where I’m getting help.

I’ve sketched out basic diagrams of how this will work, and have started researching the exact hardware I’ll need to make it happen. The more I research and talk to people about the idea, the less simple it seems. I’m realizing making this theoretical idea a physical reality is quite a bit more complicated than I initially thought. But luckily, every time I talk to people we come up with even more potential applications for a sensor board like this.

Once the hardware is built, the applications are seemingly endless. here are just a few that have come up.

  • Use it to play Battleship. But no calling ‘A4’, you just try to hit a spot with the ball, and wherever you hit, that’s where you hit.
  • Use it as an instrument, block different beams to play different notes.
  • Use it for pitching practice, to track accuracy.
  • Use it to draw/paint by dragging your hand through the beam grid. Or you could choose a color on a tablet, then throw a ball to plot that color wherever you hit on a grid.
  • If other people built these sensor boards, we could have people all over the world throwing at boards and contributing to the same images, or playing Battleship remotely.
  • Group throwers by skill level or age, and have them recreate the same source images. How does that affect the fidelity of the recreations?
  • People could take photos of themselves with a phone, then that photo could become the image they’re recreating by throwing at the board.

The possibilities are endless. And beautifully, it’s a way to be ACTIVE while interacting with computers and creating art.


Standard